15th July, 2017
Yakuake Support
Hello readers and developers ! Today I am going to discuss another vital component of RCManager, which I worked upon as a part of my GSoC project. This neat tool isn’t just a mere graph drawing device. It is also supposed to let you interact with the actual robotic components by letting you start/stop them at a mouse click. Lets dive a little deeper to know more.
Quick Recap - RCManager uses xml format to store the details about the component graph. Each node represents a robotic component say a robotic arm. Each edge between the nodes represents the dependency of a component on the other. Ideally, a robotic component can be fired only if all of its dependencies are already up and running. The xml file stores the description of each of those nodes. Typically, a component is represented as follows:
<node endpoint="default: tcp -h localhost -p 10000" alias="com1">
  **<upCommand command="python /home/robocomp/robocomp/components/rcmanagerTest/com1/src/com1.py --Ice.Config=/com1/etc/config"/>**
  **<downCommand command="killall -9 com1"/>**
  <xpos value="-446.689404122"/>
  <ypos value="6.214678174"/>
  <configFile path="/home/robocomp/robocomp/components/rcmanagerTest/com1/etc/config"/>
  <radius value="10.0"/>
  <dependence alias="com2"/>
</node>
When you load an xml file into RCManager, it retrieves all the information about the nodes and stores it into the model.py. To start a component, you need to retrieve the upCommand attribute of that node (from the xml), copy paste, and execute it in a new terminal session. This is of course very easy to do, but not convenient, especially when you are busy experimenting with a robot.
Dr. Pablo suggested the usage of the KDE Yakuake, an open source drop-down terminal emulator for the KDE desktop, but which also works fine on GNOME. This idea avoids the hassle of opening multiple bash type terminals for each component, you never know how many components you would be dealing with. Yakuake pops up and back with a keystroke of F12, and supports multiple tabbed sessions, which is conducive to a seamless user experience.
I have provided the basic support for using Yakuake with RCManager in a separate file named yakuake_support.py. In order to interact with Yakuake via RCManager, I have used the QDBus interface, which provides all of the necessary operations like opening a new named tab, closing tabs, executing commands in a certain tab, etc. Lets look at the following example:
Opening a new named tab in Yakuake via terminal To open a name tab, type the following commands: $ yakuake // Start Yakuake $ qdbus org.kde.yakuake /yakuake/sessions org.kde.yakuake.addSession // Open a new session in Yakuake $ qdbus org.kde.yakuake /yakuake/tabs org.kde.yakuake.setTabTitle “sessionId” “tabTitle”// Set the tab title
You can use the subprocess library in python to fire these commands through the script itself. A lot of such nifty tools are mentioned in this awesome blog that I found. I would highly recommend you to have a look at it.
Having this powerful interface makes things easier. Everytime the user attempts to start a component, I pass the corresponding command to yakuake_support.py as parameters, which then uses QDBus to get the job done. Commands related to a particular component are executed in tabs bearing the alias of the component. It also maintains a dictionary of components to identify the correct named tabs while executing commands. The following diagram illustrates this feature in action.
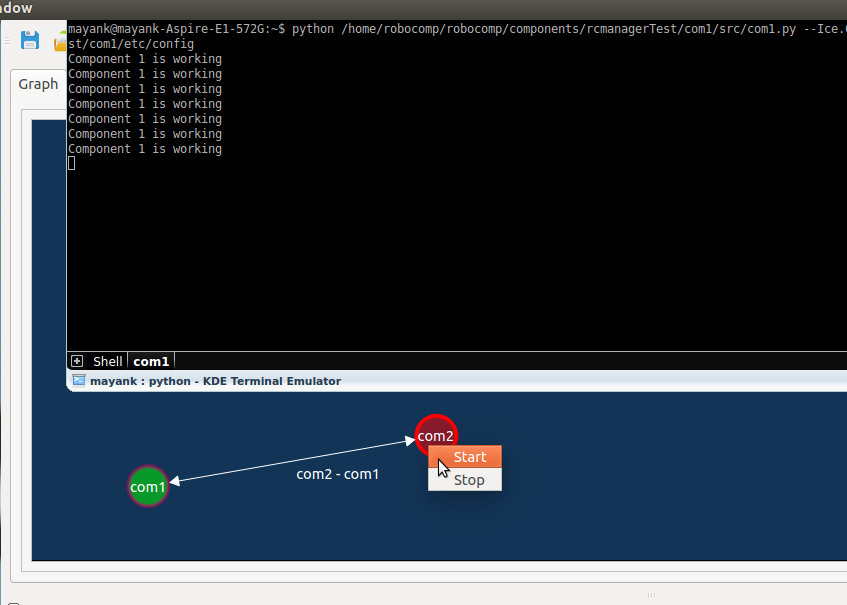
As you can see, the running components are marked green and the stopped ones red. How this is done in real time is another story and will be discussed in a later post. As always feel free to contact me via GitHub or e-mail, if you need any support.
Email - kr.mayank1997@gmail.com